For many years I’ve been curious about AMD CPUs and Linux. When I saw a 2020 Lenovo Legion 5 (15ARH05H) at a very reasonable price (under £1,000), I couldn’t resist. I could have bought a more recent model which cost slightly more (with the AMD Ryzen 7 5800H), but the screen wasn’t as good (less color accuracy, not as bright, lower refresh rate), and the model I purchased came with a 3 year on-site next business day warranty!
Things I don’t like about the Legion 5
- Installation of Linux not straight forward (more on this in a sec).
- The 144Hz screen only has one setting: 144Hz.
- The power brick is large and heavy.
- Runtime D3 (RTD3) doesn’t work.
- It’s cumbersome switching between dedicated GPU, hybrid, and integrated GPU modes.
- On start-up, sometimes the touchpad module doesn’t load properly.
- Speakers a little on the soft side.
Things I like about the Legion 5
- It runs Linux quite well.
- The 144Hz screen only has one setting: 144Hz.
- The keyboard is great to type on (personal preference).
- The screen is very nice – bright, good color accuracy.
- Great battery life when in iGPU mode (I have the 86WHr battery).
- Runs cool and quiet (completely silent most of the time).
- Good expansion options (2 RAM slots, 2 M.2 slots, can swap out the WiFi chip).
Anyway, less yappin’, more tappin’ – on the keyboard, that is!
This image will be replaced soon!
Boot from installation media and set up WiFi
Unfortunately, the WiFi isn’t switched on by default. This is easily fixed though (see steps below). Also, you can avoid the steps in this section if you connect to the Internet using a network cable.
- In the BIOS (F2 while booting), make sure “Switchable Graphics” is selected.
- Insert the Arch installation USB flash drive in one of the USB slots and reboot.
- While booting, repeatedly press F12 to bring up the “Boot Selection” menu.
- Select the USB EFI device that contains the flash drive with the Arch installer.
- The Z shell will load. Once it does, run:
rfkill unblock all - Run the “Internet Wireless Control Utility”:
iwctl - Display your WiFi device name:
station list - List available WiFi access points:
station <device> get-networks - Connect to your WiFi:
station <device> connect <network_name> - Enter your WiFi password when prompted to do so.
Install Minimal Arch Linux Base
I prefer to install Arch Linux using archinstall. However, when using archinstall, it will create a separate /home partition, and your root partition (/) will only be 40GB. I prefer not having a separate /home partition. To get around this, I do a “dry run”, then edit the partition details, then run archinstall again.
- Run
archinstall --dry-run - Enter details as required when prompted to do so (should be self-explanatory, read steps below).
- When asked which “pre-programmed profile” you wish to install, select
minimal. - When ask which network packages you wish to use, select
NetworkManager. - When asked which additional packages you wish to install, enter
openssh. - Use
vimornanoto edit/var/log/archlinux/user_disk_layout.json - Modify the partitions as required (it’s JSON, should be self-explanatory).
- Re-run
archinstallwith:archinstall --config /var/log/archinstall/user_configuration.json \
--creds /var/log/archinstall/user_credentials.json \
--disk_layouts=/var/log/archinstall/user_disk_layout.json
Here’s an example of my preferred partitioning:
{
  "/dev/nvme1n1": {
    "partitions": [
      {
        "boot": true,
        "encrypted": false,
        "filesystem": {
          "format": "fat32"
        },
        "format": true,
        "mountpoint": "/boot",
        "size": "513MB",
        "start": "5MB",
        "type": "primary"
      },
      {
        "encrypted": true,
        "filesystem": {
          "format": "ext4"
        },
        "format": true,
        "mountpoint": "/",
        "size": "100%",
        "start": "518MB",
        "type": "primary"
      }
    ],
    "wipe": true
  }
}
After following the above steps, you should end up with a base Arch Linux installation (i.e. no GUI or desktop – when you boot and log in, you’ll be greeted with a BASH prompt). The above is the way I prefer to install Arch as it leaves you with a “minimal” install, and it’s then up to you install your preferred desktop environment etc…
Setting Up WiFi (post installation)
Even though WiFi was configured during the installation, post-installation it disappears. In order to install your desktop environment, you need to set up your WiFi again (or connect to the Internet using a network cable). Thankfully, connecting to WiFi is very straight forward with nmtui (Network Manager Text User Interface).
- From the terminal, enter:
nmtui - Select Activate a Connection.
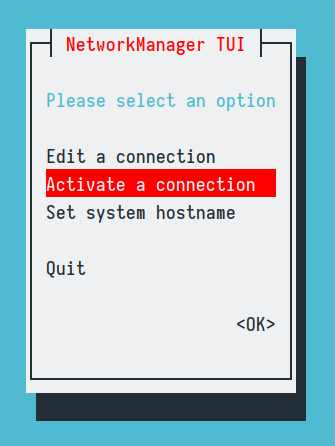
- In the WiFi section, select your WiFi access point.
- Enter the password for your WiFi when prompted.
- Navigate back, and then quit
nmtui.
Install the KDE Plasma Desktop Environment
sudo pacman -S xorg plasmasudo systemctl enable sddm.servicesudo systemctl enable NetworkManager.servicesudo pacman -S packagekit-qtsudo reboot
Installing Nvidia and Optimus Manager
Normally, when you have an Nvidia GPU, you have four options on Linux:
- Dedicated GPU mode (i.e. the integrated GPU is disabled).
- Hybrid mode (i.e. both the Nvidia GPU and integrated GPU are sued).
- Integrated GPU mode (i.e. the Nvidia GPU is disabled and powered down).
- Runtime D3 (i.e. RTD3: the Nvidia GPU dynamically powers down when not in use).
This is one of the pain points for Linux on this particular laptop (the 15ARH05H model). RTD3 simply doesn’t work, and switching between “integrated GPU” and “dedicated GPU” modes is complicated (although admittedly, this may be because I don’t know how to set it up properly on this laptop). Regardless, I still have a way of choosing between “integrated” and “dedicated” GPU modes, so I’ll mention the steps I took (take) to get this working…
For those who don’t know how to download and install packages from the AUR, here’s one way to do it:
$ git clone https://aur.archlinux.org/optimus-manager.git
$ cd optimus-manager
$ makepkg -s
$ sudo pacman -U optimus-manager-1.4-4-any.pkg.tar.zst
Install optimus-manager and optimus-manager-qt:
- Install the Nvidia driver:
sudo pacman -S nvidia - Build and install
optimus-managerfrom here. sudo reboot- Build and install
optimus-manager-qtfrom here. sudo reboot
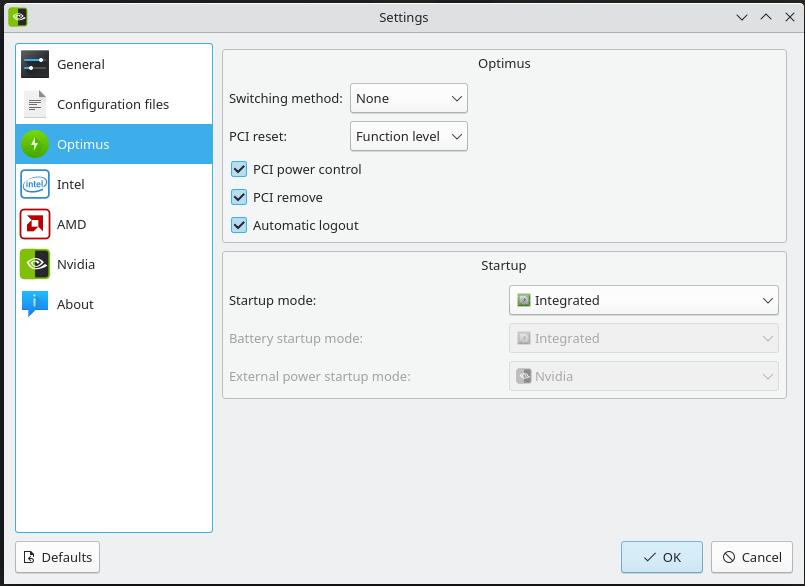
Run optimus-maanger-qt and configure it as follows:
- Tick
Launch at startup(in “General” settings). - Navigate to
Optimusin the left-hand navigation menu. - Tick
PCI power control - Tick
PCI remove - Tick
Automatic logout - Set
PCI resettoFunction level(probably not necessary).
Reboot, and you should be good to go! What you should have now is an installation the defaults to the Integrated GPU (i.e. so the Nvidia GPU should be completely powered off). You can confirm this by using powertop or powerstat – at idle with 30% screen brightness, power consumption should settle at around 8W.
PowerTOP 2.14     Overview   Idle stats   Frequency stats   Device stats   Tunables   WakeUp

The battery reports a discharge rate of 8.85 W
The energy consumed was 0.00 J
The estimated remaining time is 7 hours, 38 minutes

Summary: 214.5 wakeups/second,  0.0 GPU ops/seconds, 0.0 VFS ops/sec and 4.3% CPU use

                Usage       Events/s    Category       Description
              2.9 ms/s     139.2        Interrupt      [114] amdgpu
            455.2 µs/s      21.6        Timer          tick_sched_timer
             34.1 ms/s       0.9        Process        [PID 2497] powertop
            151.4 µs/s      10.3        kWork          psi_avgs_work
             28.5 µs/s       8.5        kWork          toggle_allocation_gate

...
[syd:legion5] powerstat $ sudo powerstat
Running for 300.0 seconds (30 samples at 10.0 second intervals).
Power measurements will start in 180 seconds time.

  Time    User  Nice   Sys  Idle    IO  Run Ctxt/s  IRQ/s Fork Exec Exit  Watts
17:58:27   0.0   0.0   0.0  99.9   0.0    1    191    257    6    2    2   7.43
17:58:37   0.0   0.0   0.0 100.0   0.0    1    104    204    0    0    5   6.74
17:58:47   0.0   0.0   0.0  99.9   0.0    1    387    375    0    0    0   6.57
17:58:57   0.1   0.0   0.1  99.7   0.1    1    780    604    6    2    2   6.57
17:59:07   0.0   0.0   0.0 100.0   0.0    1    119    213    1    0    4   6.57
17:59:17   0.0   0.0   0.0 100.0   0.0    1     97    200    1    0    0   6.58
17:59:27   0.1   0.0   0.1  99.9   0.0    1    477    431    6    2    2   6.57
17:59:37   0.1   0.0   0.1  99.9   0.0    1    290    399    1    0    1   6.81
17:59:47   0.0   0.0   0.0 100.0   0.0    1     90    194    0    0    4   7.38
17:59:57   0.0   0.0   0.0 100.0   0.0    1     88    195    0    0    2   7.68
18:00:07   0.0   0.0   0.0  99.9   0.0    1    369    356    0    0    0   7.89
18:00:17   0.0   0.0   0.0 100.0   0.0    1     82    191    0    0    0   7.92
18:00:27   0.0   0.0   0.0 100.0   0.0    1     94    200    0    0    0   7.95
18:00:37   0.1   0.0   0.1  99.8   0.0    1    669    610    6    2    2   7.67
18:00:47   0.0   0.0   0.0 100.0   0.0    1     96    200    0    0    4   6.91
18:00:57   0.0   0.0   0.0 100.0   0.0    1     91    196    0    0    0   6.62
18:01:07   0.0   0.0   0.0 100.0   0.0    1     97    200    0    0    0   6.59
18:01:17   0.0   0.0   0.0 100.0   0.0    1     88    192    0    0    0   6.59
18:01:27   0.0   0.0   0.0 100.0   0.0    1     89    194    0    0    0   6.59
18:01:37   0.1   0.0   0.0  99.9   0.0    1    248    290    8    2    3   6.59
18:01:47   0.1   0.0   0.1  99.9   0.0    1    419    390    2    0   10   6.59
18:01:57   0.0   0.0   0.0 100.0   0.0    1     99    201    0    0    3   6.59
18:02:07   0.1   0.0   0.1  99.8   0.0    1    719    688    6    2    2   6.58
18:02:17   0.0   0.0   0.0 100.0   0.0    1    104    204    0    0    5   6.59
18:02:27   0.0   0.0   0.0 100.0   0.0    1     83    191    0    0    0   6.58
18:02:37   0.1   0.0   0.1  99.8   0.0    1    667    541    0    0    0   6.59
18:02:47   0.0   0.0   0.0 100.0   0.0    1    104    205    0    0    0   6.58
18:02:57   0.0   0.0   0.0  99.9   0.0    1    388    376    1    0    0   6.58
18:03:07   0.1   0.0   0.1  99.8   0.0    1    477    423    6    2    3   6.58
18:03:17   0.1   0.0   0.1  99.8   0.0    1    398    544    6    2    5   6.58
-------- ----- ----- ----- ----- ----- ---- ------ ------ ---- ---- ---- ------
 Average   0.0   0.0   0.0  99.9   0.0  1.0  266.8  315.4  1.9  0.5  2.0   6.87
 GeoMean   0.0   0.0   0.0  99.9   0.0  1.0  191.9  285.5  0.0  0.0  0.0   6.85
  StdDev   0.0   0.0   0.0   0.1   0.0  0.0  218.9  150.6  2.7  0.9  2.3   0.48
-------- ----- ----- ----- ----- ----- ---- ------ ------ ---- ---- ---- ------
 Minimum   0.0   0.0   0.0  99.7   0.0  1.0   82.0  190.6  0.0  0.0  0.0   6.57
 Maximum   0.1   0.0   0.1 100.0   0.1  1.0  780.5  688.2  8.0  2.0 10.0   7.95
-------- ----- ----- ----- ----- ----- ---- ------ ------ ---- ---- ---- ------
Summary:
System:   6.87 Watts on average with standard deviation 0.48
At this point, you should have an Arch installtion (running KDE Plasma) that boots in to “integrated GPU” mode (i.e. so the Nvidia GPU is completely powered off). Normally with optimus-manager, you would switch to the Nvidia GPU using the graphical optimus-manager-qt interface (by right-clicking on the optimus-manager-qt icon in the taskbar), but this doesn’t work properly on the Legion 5 (perhaps because I haven’t set it up properly – I need to investigate further).
Swtiching Between iGPU and dGPU
Switching between the dedicated Nvidia GPU and the integrated Radeon RX Vega 7 is messy. I think I should reiterate that this may be because I haven’t set things up correctly. If you have the same laptop and you know how to set up optimus-manager to switch between iGPU and dGPU modes, THEN PLEASE MESSAGE ME!!.
To switch to the dedicate Nvidia GPU:
sudo pacman -R optimus-manager-qt optimus-manager- Reboot, and repeatedly press F2 to bring up the BIOS.
- Once in the BIOS, select Discrete Graphics.
- Save and Exit.
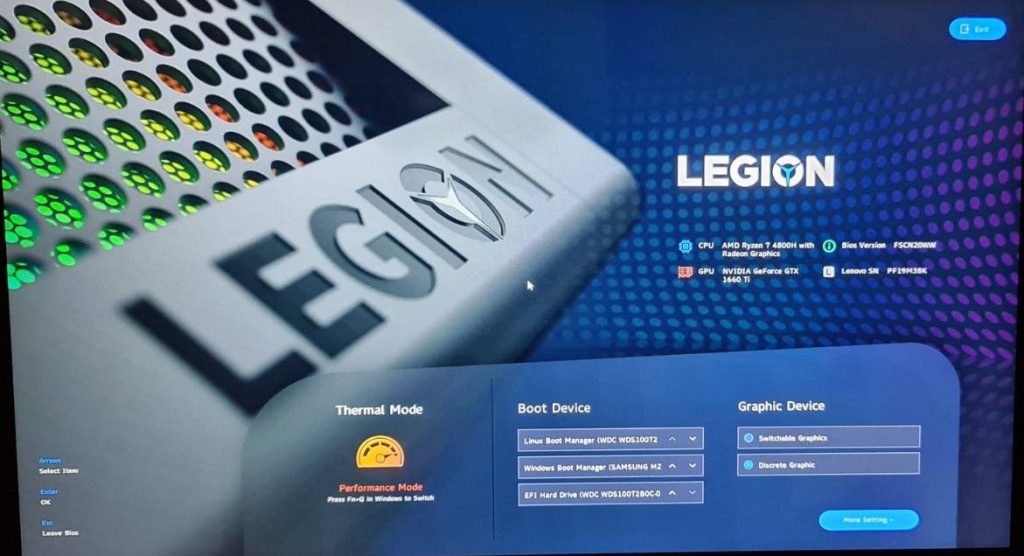
To switch back to the integrated GPU:
- Re-install
optimus-managerandoptimus-manager-qt. - Reboot, repeatedly pressing F2 to bring up the BIOS.
- Select Switchable Graphics.
- Save and Exit.